Yesterday, I managed to get my second game of Warhammer for 2013 (which, based on previous years, now makes me a prolific player!)
This time, it was a much smaller clash than the first game of 2013 (which, if you're interested, you can read more about
here). We set up a 1500pts clash between Paul's High Elves and my own Wood Elves (who haven't seen the light of day for probably 12-18 months). Neither of us was aware of what army the other would be bringing; I was expecting Lizardmen or Vampire Counts and Paul was expecting Skaven, so we were both a little surprised! Paul suggested that his wizards had come to Athel Loren in search of a nice tree to make some more wands...
My army list was as follows:
Spellweaver (Lore of Life) ~ 350pts
- Lv.4, Wand of Wych Elm, Talisman of Preservation (4+ Ward)
Glade Guard (19) ~ 256pts
- Standard Bearer, Musician, Banner of Eternal Flame
Glade Guard (10) ~ 126pts
- Musician
Glade Guard (10) ~ 126pts
- Musician
Scouts (6) ~ 102pts
Scouts (6) ~ 102pts
Dryads (10) ~ 120pts
Wardancers (6) ~ 122pts
- Bladesinger
Treekin (3) ~ 195pts
Total ~ 1499pts
Paul's army looked a little something like this:
Archmage – Annulian Crystal, Lv.4
12 Archers
12 Archers
13 Archers
Lion Chariot
Lion Chariot
18 Swordmasters – Standard, Champion, Banner of Sorcery
Bolt Thrower
Bolt Thrower
Total - 1494pts*
Rolling for spells, I went with the Lore of Life and got Flesh to Stone, Throne of Vines, Regrowth and Dwellers Below (which I swapped for Earthblood - in hindsight, it probably would have been better to keep Dwellers!)
Paul plumped for the Lore of Fire (his fondness for destructive spells won through) and rolled Cascading Fire Cloak, Flaming Sword of Rhuin, Burning Head and Piercing Bolts of Burning (which he swapped for Fireball).
Deployment
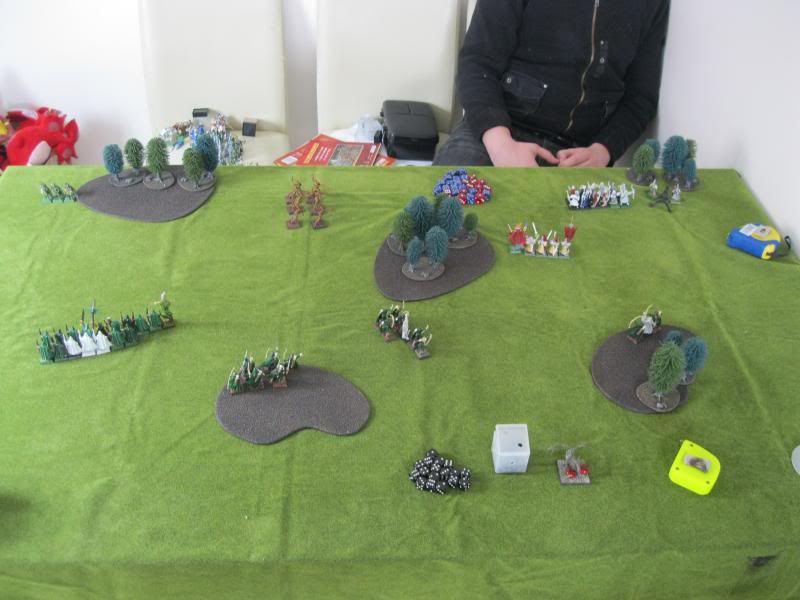
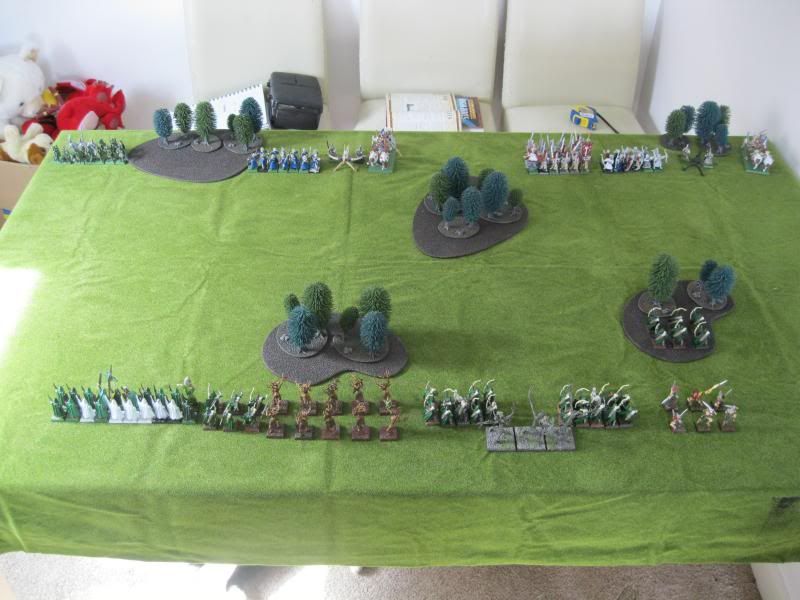 |
HE from L-R: Green Archers, Blue Archers, Bolt Thrower, Lion Chariot, Swordmasters (with Archmage), Archers, Bolt Thrower, Lion Chariot
WE from L-R: Big Glade Guard (with Spellweaver), Scouts, Dryads, 2nd Glade Guard, Treekin, 1st Glade Guard, Wardancers, Scouts |
 |
| A couple of deployment shots; the HE spread themselves across the board, with their firepower distributed fairly evenly. The WE went a bit more compact, with the shooting primarily focused on the centre and left flank |
The pictures show the deployment (as always, click for a zoomed image). I placed my shooting more or less centrally, to deal with one or both of the Lion Chariots and the Swordmasters (which I more or less rightly assumed would be placed as centrally as possible either side of the wood). Paul chose to spread his shooting pretty widely across the board.
Despite finishing deployment first and getting a +1 on the dice, I still lost the roll off for first turn and so the Asur kicked off.
Turn 1
The Asur started off with a relatively modest Movement phase; the Lion Chariots both advanced and the Swordmasters trudged towards the Treekin and Glade Guard units ahead of them. Everything else stayed still in order to shoot at full effect.
Magic was a bit of a damp squib for Paul; Burning Head was let through and failed to inflict a single wound on either the Glade Guard or Treekin, Flaming Sword of Rhuin was easily dispelled, and the final attempt to cast a boosted Fireball failed to achieve the casting value.
Shooting followed, and couldn't fail to be more effective than the Magic phase (although it tried!) The right-hand Bolter failed to wound anything, while the right-hand Archers killed two of the 1st Glade Guard unit. On the other flank, the left-hand Bolter, blue and green Archers fired at the large Glade Guard unit and killed a combined total of six (although they passed the resultant Panic test).
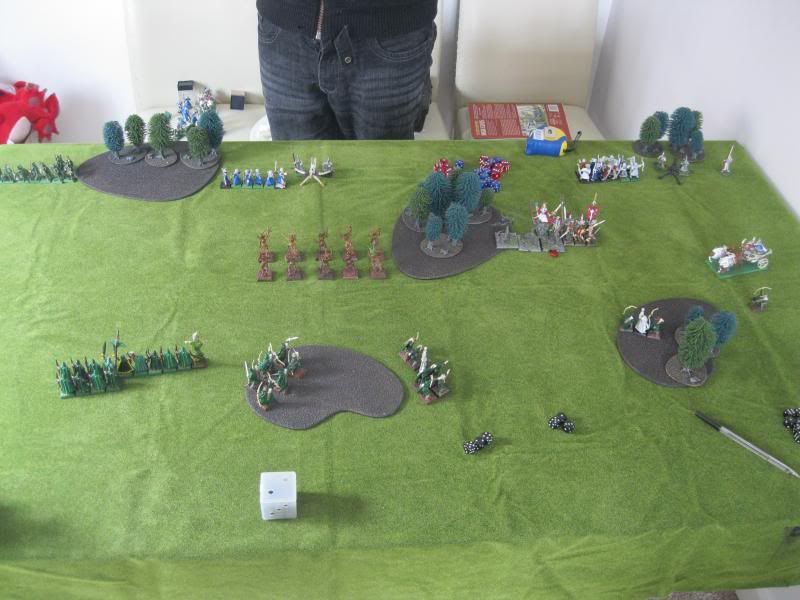
 |
| T1 after HE and WE moves |
On to the Wood Elf turn and an all-out advance ensued, with each unit moving to get into a better position. The Dryads took up position on the edge of the central wood, the Wardancers did likewise in the right-hand wood. The Glade Guard and Scouts all advanced to get into short range wherever possible.
In the Magic phase, Paul managed to end up with more Dispel Dice than I had Power Dice (a combination of a low roll for the Winds of Magic, Paul channeling where I failed and the Annulian Crystal...). Needless to say, nothing was achieved as Throne of Vines and Flesh to Stone were both easily dispelled.
The real business of the turn was the Shooting phase, however. With a Lion Chariot swiftly bearing down on them, the large Glade Guard unit needed to act quickly. In the end, the 2nd Glade Guard unit beat them to it - 10 shots, 6 wounds and 4 failed saves later, scratch one Lion Chariot! The rest of the shooting couldn't quite top that, but it wasn't too shabby. The large Glade Guard and left-hand Scouts took out seven of the blue Archers, while the 1st Glade Guard and right-hand Scouts felled six Swordmasters between them. Unfortunately, both units passed their Panic tests.
Turn 2
With the threat of the Lion Chariot neutralised, there was only one charge for Paul to declare - the Swordmasters into the Treekin. I wasn't confident of the Treekin surviving such a charge but luckily they didn't have to as the Swordmasters rolled a dismal 3" for their charge movement and so ended up crawling just a couple of inches forwards.
As a result, the surviving Lion Chariot readjusted itself in order to set up a flank charge on whichever units inevitably charged the Swordmasters in my turn. Once again everything else stood still to fire.
Magic followed, and Burning Head was once again cast and let through, and once again failed to inflict a single wound and anything it hit. Fireball was next up, and this time went through with Irresistible Force, killing five out of the six right-hand Scouts and causing a wound on the Archmage to boot. The lone Scout managed to pass his Panic test!
Shooting inflicted yet more hurt on the Asrai, as the right-hand Bolter and Archers combined to kill five of the 1st Glade Guard unit. The left-hand Bolter fired at the 2nd Glade Guard, killing three, while the blue and green Archers once again fired at the big Glade Guard unit and this time killed seven. Luckily for me, all Panic tests were passed.
 |
| T2 following HE and WE moves |
My second turn saw the Treekin and Wardancers declare a joint charge on the Swordmasters, while everything else again moved for a better shooting position. Crucially, the 2nd Glade Guard unit failed to make their Swift Reform to face the Lion Chariot, and thus couldn't shoot!
Magic saw the first successes of the game, with Throne of Vines and Regrowth getting through (regrowing seven Glade Guard in the big unit). Flesh to Stone was dispelled. Shooting, however, was a drab affair with the only casualties coming from the big Glade Guard unit on the green Archers, killing four of them.
Combat was a bit of a gamble at this point, and it proved to be one that was ultimately a losing hand for the Wood Elves as the Wardancers inflicted only a single casualty on the Swordmasters with Woven Mist (giving them ASF at the cost of -1 Attack). The Swordmasters replied with three unsaved wounds on the Wardancers and one wound on the Treekin. The Treekin kept the Wood Elves in the combat with three more dead Swordmasters, resulting in a drawn combat. Now the Asrai were stuck at the mercy of a flanking Lion Chariot...
Turn 3
Predictably, the Lion Chariot rolled into the flank of the Wardancers while everything else stood still.
 |
| The state of the battle at the start of T3 |
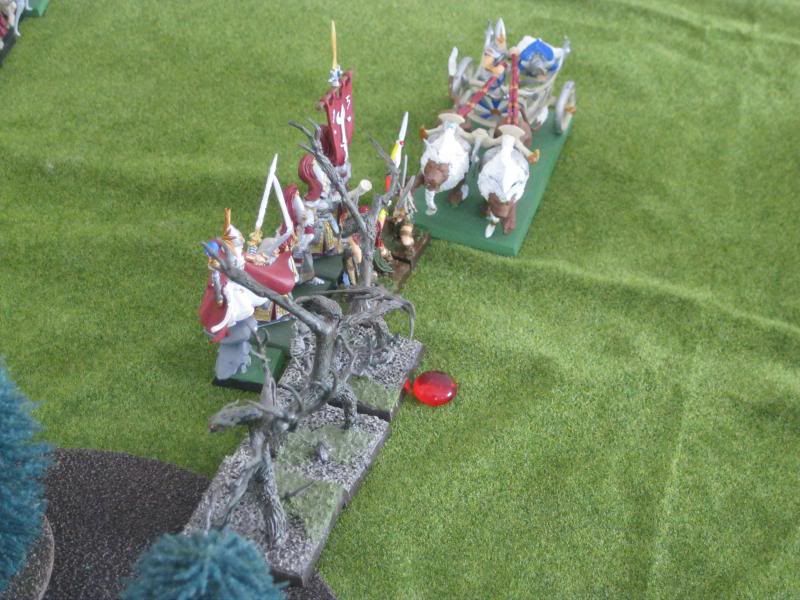 |
| The Lion Chariot trundles into the Wardancers' flank |
Magic came next, and through a combination of Winds, the Banner of Sorcery and channeling, Paul ended up with the maximum 12 Power Dice to use (against my 5 Dispel Dice...)
Unfortunately, as the Archmage was still stuck in combat, Paul only had two spells he could use. With so many Power Dice at his disposal it was pretty much inevitable that both Cascading Fire Cloak and Flaming Sword got through (although Flaming Sword was IF, and cost Paul the remaining Power Dice in his pool), with the Fire Cloak wiping out the Wardancers and inflicting four wounds on the Treekin. At this point, we found ourselves in an odd position - with the Wardancers now gone, the Lion Chariot (who had just charged) found himself no longer in contact with any enemies. We weren't sure exactly how to play this (I'm sure it's covered by the rules, but we're rusty...) but we judged that as the Wardancers had been wiped out by magic, the Lion Chariot's charge was basically nullified - it wouldn't get an overrun move, and it was no longer part of the combat.
Shooting saw more casualties inflicted - the right-hand Bolter cruelly slew the lone Scout, while the left-hand Bolter and blue Archers managed to slay four Dryads. The green Archers continued the archery duel by killing two of the big Glade Guard unit.
Combat saw the Swordmasters inflict another four wounds on the Treekin, who only managed to inflict a single wound on the Archmage in return. Predictably, the sole remaining Treekin fled. More importantly, the Swordmasters pursued just 3" (there's a theme emerging here!) and so ended up sitting right in front of the Lion Chariot.
The Wood Elf turn came around, and the Dryads pounced on the left-hand Bolter (who elected to hold, but failed their Fear test - WS1 it is then!). Meanwhile, the remaining bowmen closed with the enemy wherever possible.
Magic proved the most successful turn yet; Throne of Vines was still in play (because Paul had lost the chance to dispel it in his previous turn thanks to the IF and resultant Miscast), so Regrowth managed to restore another five Glade Guard to the big unit, and Flesh to Stone went through with IF on the Dryads (and I got to ignore the Miscast - no blowing up my own wizards this time!).
Shooting mirrored the first turn, with the 1st and 2nd Glade Guard units combining to slay the second Lion Chariot with another repeat performance (10 shots, 6 wounds, 4 failed saves!). Shocked at the efficiency of the Asrai shooting, the Swordmasters turned tail and ran a whole 2"...
The newly regrown Glade Guard killed another six green Archers, although they managed to pass their Panic test. The Scouts must have had their shots blocked by the charging Dryads, because they managed to miss the blue Archers entirely.
As expected, combat was an extremely one-sided affair with the now-Toughness 8 Dryads inflicting a grand six wounds on the Bolter crew; the nearby blue Archers panicked and fled the table rather than face the fury of the Forest Spirits.
 |
| The end of T3 from the WE side - things are looking grim for the Asur. |
Turn 4
Turn 4 was a short affair for both sides; the High Elves rallied the Archmage although the Swordmasters continued to flee. The following Magic phase proved to be fatal, as the first spell (Burning Head again...) cast on IF with the resultant Miscast taking the final wound off the Archmage, and, just to rub salt into Paul's wounds, it failed to inflict any wounds for the third time in the game!
Shooting was all Paul had left, with the remaining Bolter killing five of the 2nd Glade Guard unit (who flee) and the right-hand Archers slaying the last of the 1st Glade Guard unit.
The Wood Elf Turn 4 saw the Dryads advance on the right-hand Archers and Bolter, while the big Glade Guard unit Swift Reformed to do the same. The Scouts advanced out of the wood to get closer to the green Archers causing one casualty, which proved to be enough for them to turn tail and flee the table.
Magic saw Throne of Vines still in play, which enabled me to cast boosted versions of both Regrowth and Flesh to Stone on the Dryads, bringing them back up to 10-strong and Toughness 8.
Turn 5
With Paul only having a single unit of Archers and a Bolter in play, and with no targets available to either of them, all he could do was move them to face the oncoming Dryads and hope for the best...
 |
| The end draws nigh... |
The only important move of the Wood Elf fifth turn was to charge the Dryads into the Archers. Flesh to Stone was again cast on the Dryads, keeping them at Toughness 8. The combat was even more one-sided than against the Bolter crew, with the Archers inflicting no damage at all and the Dryads wiping out nine of the dress-wearing fops in return. The last surviving Archers flee and are caught, and the Bolter flees the table at the sight of their mangled bodies.
Conclusion
All in all, the game ended in a clear Wood Elf victory with 1594VPs to 671VPs (a Crushing Victory, or a Massacre in 7th Edition terms - I still prefer the increased number of gradations from 7th Edition to the more simplistic 8th Edition approach of just Win/Draw/Loss).
In fairness to Paul, his army was not an ideal selection to face my own army and he pretty much brought a knife to a gunfight (although as neither of us were aware of what army list, or even what race, the other was taking, neither of us had an advantage in that department - it could just as easily have worked the other way around!)
In the end, I think by and large, Paul played into my hands. He spread his Archers all the way across the board, which prevented him bringing all of his firepower (which wasn't much short of my own) to bear on any particular section of my army, forcing him to spread his shots across multiple units and allowing me to soak up the few casualties. As any Wood Elf general (not to mention generals of several other notable "shooty" armies!) will tell you, the key to shooting is to concentrate your firepower and prioritise your targets. Granted, I may have rolled above average in killing the first Lion Chariot with just one unit of Glade Guard, but more importantly I had another 26 shots I could have fired at the Chariot if the first unit hadn't done the job...
One thing I will have to remember in future is not to simply line my archers up across the table and engage in bowline vs. bowline as I did here. I got away with it this time, and my shooting proved superior in the end, but it was a bit daft to stick the big unit of Glade Guard out in the open in front of 25 Archers, a Bolt Thrower and a Lion Chariot. It occurred to me immediately after deployment that I really should have made a lot more use of the cover to protect my archers (there'd be no way the Chariots would charge into the woods to get at them. Using the woods to cover my deployment would have saved me some casualties on the first turn through target denial, and I'd have still been able to make the most of my own shooting thanks to the Wood Elves' abilities to move through woods and shoot without penalty for moving. Just a little thing, but against a more deadly army than Paul's, I could have really suffered in that first turn.
The charge of the Treekin and Wardancers into the front of the Swordmasters was another debatable decision. When their own charge faltered, I saw the opportunity to launch a combined charge and took it without hesitation, despite the presence of the Lion Chariot. In hindsight, that was probably a mistake and I'd play things differently now. For one thing, I'd have probably been more successful if I'd denied Paul the combat and simply shot the Swordmasters to bits instead. They're absolutely brutal in combat (two S6 attacks each, with ASF and usually getting rerolls to hit thanks to their high Initiative) but they'd have fallen easily to arrows (they only have a 5+ AS, so at short range against Glade Guard, only 1 in 6 would survive...). There was also the distinct possibility of getting the charge on the Lion Chariot if I'd have moved the Wardancers to the right-hand corner of the wood (i.e. where the Scouts were placed). There was no way the Lion Chariot would have charged into the wood against skirmishers, the Wardancers would likely have beaten the Chariot on the charge, and any pursuit/overrun would have taken them to the top right-hand corner of the table to threaten the Bolter and Archers (if it carried them out of LoS, they'd have survived to charge the Bolter and overrun into the Archers; if they remained in LoS, they'd have been the sacrificial lambs to take fire off my archers!).
Still, you live and learn. Even with such a crushing victory, there were things I could have done better/differently. Despite not having been allowed out for a game for some time, this battle shows why Wood Elves are my favourite army (and, dare I say it, the army I play best with!) I might have to bring them out to play more often now. Now, I'm off to put on my warpaint, offer my prayers to Kurnous and Isha and paint some more Glade Guard...
Until next time!
* Having got home from the game and taken a look at the HE army book, it turns out that Paul's army actually cost 1531pts (Paul mistakenly thought his Archers were 10pts each, rather than 11pts)